
Introduction

Christmas Nails, The holiday season is all about embracing the joyous spirit and spreading festive cheer. And what better way to showcase your Christmas enthusiasm than through your nails? That’s right, Christmas nails are here to make a statement and add that extra touch of magic to your overall holiday look. In this article, we will explore the wonderful world of easy Christmas nail designs specifically catered to the youthful crowd. Get ready to channel your inner creativity and wow everyone with your festive fingertips!
The Art of Easy Nail Designs: A Brief Overview
Creating beautiful and eye-catching nail designs doesn’t have to be a daunting task. In fact, it can be a fun and exciting endeavor that allows you to express your personal style and embrace the holiday season. Whether you’re a DIY enthusiast or a novice in the world of nail art, there are plenty of easy designs that will leave an impression without requiring professional training or complicated techniques.
Tools of the Trade: Must-Have Supplies for Perfect Christmas Nails
Before diving into the world of Christmas nails designs, it’s important to equip yourself with the necessary tools and supplies. Here are the essentials you’ll need to create flawless nail art:
Nail Polish: Invest in a variety of colors that suit your desired Christmas nails theme. From vibrant reds and greens to shimmery metallics and serene whites, having a diverse range of nail polishes will provide you with endless possibilities.
Nail Brushes: A set of nail brushes with different sizes and shapes will help you achieve precise and intricate designs. Look for brushes with fine tips for intricate details and wider brushes for broader strokes.
Nail Stamping Kit: If you’re looking for a quick and easy way to create stunning designs, a nail stamping kit is a must-have. These kits usually come with image plates and a stamper to transfer designs onto your christmas nails effortlessly.
Dotting Tools: Dotting tools are versatile tools that allow you to create various patterns and shapes with ease. They come in different sizes, making it possible to create both fine details and larger dots.
Top Coat and Base Coat: To ensure the longevity of your Christmas nails, invest in a high-quality top coat and base coat. The top coat will add a glossy finish and protect your designs, while the base coat will provide a smooth canvas for your nail art.
Now that you’re armed with the essential tools, let’s dive into the world of effortless Christmas nail designs!

Classic and Chic Christmas Nail Ideas
When it comes to classic Christmas nail designs, you can never go wrong with the timeless combination of red and green. These colors instantly evoke the festive spirit and are perfect for a chic and elegant look. Here are some easy and striking designs to try:
Holly Jolly Stripes: Simple yet Striking Holiday Pattern
With a steady hand and some red and green nail polish, you can create beautiful striped patterns on your nails. Start by painting your nails with a base coat of either red or green. Once dry, use a thin nail brush or striping tape to create alternating stripes on each nail. The result is a playful and festive look that will impress everyone at your holiday gatherings.
Candy Cane Delight: Easy Peppermint-Inspired Nails
For a sweet and whimsical design, opt for a candy cane-inspired look. Paint your nails with a white base coat and let it dry completely. Then, using a thin brush or a toothpick, create diagonal red stripes on each nail. Finish off the look by adding small white dots between the red stripes to mimic the look of peppermint candy canes. This design is fun and festive, perfect for adding a touch of holiday spirit to your nails.
Festive French Tips: Adding a Christmas Twist to Elegance
If you prefer a more subtle and elegant look, give the classic French manicure a Christmas twist. Instead of the traditional white tips, opt for red or green tips for a festive touch. Start by applying a base coat and let it dry. Then, using either red or green nail polish, carefully paint the tips of your nails. To achieve a clean and precise look, you can use French tip guides or freehand it if you’re feeling confident. The result is a sophisticated and festive take on a timeless nail design.
Winter Wonderland Whites: Subtle and Serene Nail Art
For those who prefer a more understated and serene look, winter wonderland whites are the way to go. These designs evoke the peacefulness and beauty of a snowy landscape. Here are some easy and graceful designs to try:
Frosty Accents: Adding Shimmer and Sparkle to White Nails
To add a touch of sparkle to your winter wonderland nails, opt for frosty accents. Start by applying a white base coat and let it dry completely. Then, using a small brush or a toothpick, apply silver or iridescent glitter polish to create delicate accents on each nail. You can also add some rhinestones or small silver beads to enhance the shimmer. The result is a mesmerizing and ethereal look that will transport you to a winter wonderland.
Snowflake Dance: Graceful Designs for a Winter Vibe
Snowflakes are the quintessential symbol of winter, and there’s no better way to celebrate the season than by incorporating them into your nail designs. Start by painting your nails with a white base coat and let it dry completely. Then, using a fine nail brush or a toothpick, carefully draw snowflake patterns on each nail. You can experiment with different sizes and shapes to create a unique and whimsical look. Finish off the design by adding a touch of iridescent glitter polish to mimic the sparkle of freshly fallen snow.
Frosted Snowfall: Creating Snowy Landscapes on Your Nails
For a more intricate and artistic design, create a snowy landscape on your nails. Start by applying a light blue or gray base coat to represent the sky. Once dry, use a fine nail brush or a toothpick to paint snow-capped mountains, trees, and maybe even a little snowman on each nail. Finish off the design by dabbing some white nail polish randomly on each nail to represent falling snowflakes. This design is truly a work of art and will showcase your creativity and love for winter.
Metallic Magic: Dazzling Nails for a Glamorous Christmas
If you want to turn heads this Christmas, embrace the magic of metallic nails. The glimmering gold and silver shades are perfect for those who want to add a touch of glamour to their holiday look. Here are some easy and eye-catching designs to try:
Golden Glitz: Effortlessly Elegant with a Touch of Gold
Gold is the epitome of luxury and elegance, making it a perfect choice for a glamorous Christmas nail design. Start by applying a base coat and let it dry completely. Then, using a gold metallic nail polish, carefully paint each nail. For a more festive look, you can add some glitter or rhinestones to create dazzling accents. The result is a sophisticated and statement-making look that will shine bright all throughout the holiday season.
Silver Bells: Creating a Radiant Metallic Manicure
Silver nails are stylish and versatile, making them a go-to choice for a glamorous Christmas manicure. Start by applying a base coat and let it dry completely. Then, using a silver metallic nail polish, carefully paint each nail. To add some extra sparkle, you can apply a layer of chunky silver glitter polish on top. The result is a dazzling and radiant manicure that will surely catch everyone’s attention at any holiday gathering.
Nutcracker Nails: Inspired by the Magical World of Ballet
The holiday season often brings to mind the enchanting ballet “The Nutcracker.” You can capture the magic of this timeless performance with a nutcracker-inspired nail design. Start by applying a base coat and let it dry completely. Then, using metallic gold or silver nail polish, carefully paint each nail. To add intricate details, you can use a fine nail brush or a toothpick to create little nutcracker soldiers or ballerinas on your nails. Finish off the look by adding some rhinestones or glitter to bring the design to life. This design is perfect for those who want to add a touch of whimsy and elegance to their holiday look.
Whimsical and Fun Christmas Nail Art
The holiday season is all about embracing the magic and whimsy, and your nails should be no exception. Let your creativity flow with these adorable and playful Christmas nail designs:
Santa’s Little Helpers: Adorable Characters for Festive Nails
Bring the joy of Santa’s workshop to your fingertips with these adorable character designs. Here are a few ideas to get you started:
Playful Penguins: Nail Designs that Bring Smiles
Penguins are synonymous with winter and bring a sense of playfulness to your nails. Start by applying a base coat and let it dry completely. Then, using a black nail polish, create the body of the penguin by painting a curved shape on each nail. Once dry, add a small white dot for the belly and two smaller dots for the eyes. Complete the look by adding a tiny orange triangle for the beak. These cute penguins are bound to bring smiles wherever you go!
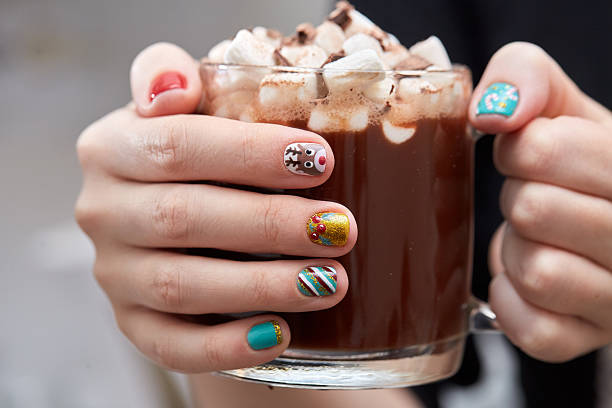
Reindeer Antics: Showcasing Santa’s Trusty Companions
Santa’s reindeer are a beloved symbol of the holiday season. Create a cute reindeer design on your nails with this simple technique. Start by applying a base coat and let it dry completely. Then, using a light brown nail polish, paint the body of the reindeer by drawing a curved shape on each nail. Once dry, add two small black dots for the eyes and a larger red dot for the nose. For the antlers, you can either freehand them with a fine nail brush or use a nail stamping kit for a more intricate look. These adorable reindeer nails will definitely make Rudolph proud!
Cheeky Elves: Capturing the Mischief of Santa’s Workshop
Elves are known for their mischievous and playful nature, making them a perfect addition to your whimsical Christmas nail designs. Start by applying a base coat and let it dry completely. Then, using a variety of nail polish colors, create the body of the elf by painting a curved shape on each nail. Once dry, add small details like eyes, a mouth, and even a little hat to complete the look. Get creative with different colors and expressions to give each elf its own personality. These cheeky elves will add a touch of fun and whimsy to your holiday ensemble.
Festive Fauna: Nature-Inspired Christmas Nail Designs
Nature is a constant source of inspiration, especially during the holiday season. Embrace the beauty of winter fauna with these nature-inspired nail designs:
Snowy Owls: Creating Majestic Nails with a Winter Bird Theme
Owls are mysterious and majestic creatures that perfectly capture the enchantment of winter. Start by applying a base coat and let it dry completely. Then, using a light blue or gray nail polish, paint each nail. Once dry, use a fine nail brush or a toothpick to create the owl’s body by drawing an oval shape. Add two small dots for the eyes and a curved beak shape. For the finishing touch, paint small white dots to represent falling snowflakes. These snowy owls will bring a touch of elegance and wonder to your nails.
Christmas Trees: Celebrating the Evergreen Symbol of the Season
Christmas trees are a timeless symbol of the holiday season and make for a beautiful and festive nail design. Start by applying a base coat and let it dry completely. Then, using a green nail polish, carefully paint each nail in the shape of a Christmas tree. For added dimension, you can use a different shade of green for the tree trunk. To embellish the design, add small dots with colorful nail polishes to represent ornaments. Finish off the look by adding a star-shaped rhinestone or drawing a star with a fine nail brush on top of each tree. These Christmas tree nails will bring the spirit of the season to your fingertips.
Jolly Robins: Charming Nail Art Featuring Red-Breasted Birds
Robins are a charming bird often associated with the holiday season. Create these adorable creatures on your nails with this easy technique. Start by applying a base coat and let it dry completely. Then, using a light brown nail polish, paint the body of the robin by drawing an oval shape on each nail. Once dry, add a small red dot for the breast and two black dots for the eyes. For a playful touch, you can even add a mini Santa hat or a tiny candy cane near the beak. These jolly robins will bring a smile to your face every time you glance at your nails.
Sweet Treats: Deliciously Festive Nail Art
The holiday season is synonymous with delicious treats and desserts. Incorporate these festive confections into your nail designs and satisfy your sweet tooth:
Frosty Cupcakes: Whimsical Designs for Nail Confectionaries
Cupcakes are a delightful treat, and they can also become the inspiration for your festive nail art. Start by applying a base coat and let it dry completely. Then, using different nail polish colors, create the base of the cupcake by painting a curved shape on each nail. Once dry, add small dots or lines with a contrasting color to represent frosting. For the finishing touch, you can use a toothpick to add sprinkles or small rhinestones for extra sparkle. These whimsical cupcake nails are sure to make you hungry for more holiday cheer.
Peppermint Swirls: Capturing the Spirit of Candy Canes
Candy canes are an iconic symbol of the holiday season, and you can capture their essence in your nail designs. Start by applying a base coat and let it dry completely. Then, using a white nail polish, paint your nails and let them dry
1 thought on “Festive Fingertips: Effortless Christmas Nails Designs for Youth”